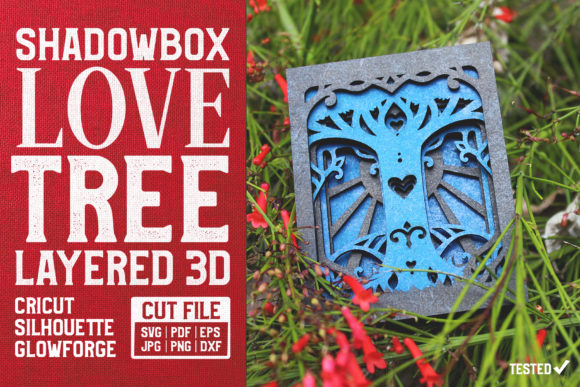
Love Tree 3D Layered Cut File
Crafting is more than just following instructions; it is about creating a tangible expression of creativity that brings warmth and beauty into your living space. Among the myriad of digital designs available to modern makers, the Love Tree 3D Layered Cut File stands out as a versatile and visually stunning option. This design features a central tree motif adorned with heart-shaped elements and ornaments, set against a backdrop of radiating rays in a landscape orientation. Whether you are an experienced woodworker or a beginner exploring paper crafts for the first time, this digital asset offers a pathway to creating sophisticated, gallery-quality art pieces.
The appeal of layered cut files lies in their ability to transform flat materials into dimensional masterpieces. By utilizing specific software and cutting machines, users can produce intricate designs that catch the light and draw the eye. The Love Tree design is particularly effective because its organic shapes contrast beautifully with the geometric precision of the rays behind it. This article explores how to maximize the potential of this file, addressing common challenges in assembly and offering practical solutions for achieving a professional finish.
Understanding the Design and Its Potential
At its core, the Love Tree 3D Layered Shadow Box SVG Cut File is a collection of vector paths designed to be sliced from various substrates. The visual hierarchy of the piece is carefully constructed: the background rays provide a sense of movement and energy, while the foreground layers focus on the intimate details of the tree, hearts, and ornaments. This structure allows for significant depth when assembled correctly.
One of the primary goals for anyone using this file is to achieve a cohesive look that does not appear cluttered. Because there are multiple layers, there is a risk of the final product looking busy if the spacing is incorrect. However, when executed well, the result is a harmonious balance between detail and negative space. The landscape format makes it ideal for wide surfaces such as mantels, desks, or above sofas, serving as a focal point that conveys themes of love, growth, and nature.
Overcoming Common Assembly Challenges
While the concept of stacking layers seems straightforward, many crafters encounter difficulties regarding stability and dimensionality. A frequent mistake is relying solely on liquid glue to adhere layers together. While glue is strong, it often seeps into the material, causing warping or flattening the intended gap between sheets. To maintain the crisp, three-dimensional aesthetic that defines high-quality shadow boxes, alternative mounting methods are recommended.
For Paper and Cardstock Projects:
If you are working with cardstock, the key to success is consistent spacing. Using double-sided foam dots, adhesive tabs, or specialized foam tape is essential. These materials create a uniform gap between each layer, ensuring that the shadows cast by the upper layers fall naturally onto the ones below. This technique enhances the illusion of depth and prevents the artwork from looking like a single thick sheet of paper. It also protects the delicate inner layers from being crushed during handling.
For Wood and Plywood Projects:
When scaling up to plywood or MDF, the structural integrity becomes even more critical. Acrylic spacers, wooden dowels, or thicker foam pads work best here. Because wood is heavier, the adhesive must be robust enough to hold the weight without sagging over time. Additionally, sanding the edges of each wood layer before assembly ensures a smooth transition between steps, preventing sharp corners from disrupting the visual flow of the rays and branches.
Step-by-Step Implementation Guide
To help you get the most out of your Love Tree 3D Layered Cut File, follow this streamlined workflow. This process is designed to minimize errors and maximize the visual impact of your final piece.
- Download and Organize: Begin by downloading the digital file to your computer. Ensure you have the correct software installed that supports the file format (typically SVG or DXF). Import the file and check the preview to ensure all layers are present and scaled correctly.
- Select Your Material: Choose your substrate based on the desired outcome. Cardstock offers a lightweight, colorful option perfect for gifts or small decor. Plywood provides a rustic, durable finish suitable for permanent wall installations. Consider the color palette; natural wood tones pair well with earthy cardstocks, while white cardstock creates a clean, modern look.
- Cut Each Layer: Upload the file to your cutting machine (such as Cricut or Silhouette). Set the appropriate blade depth and pressure for your chosen material. It is crucial to cut each layer individually or use the "weeding" process carefully to remove excess material without disturbing the intricate details of the tree and ornaments.
- Stack in Order: Consult the provided guide included with the digital file. The layers usually come numbered to indicate the order of assembly. Start with the back layer (the rays) and work your way forward. Misordering layers can disrupt the perspective and make the 3D effect look unnatural.
- Apply Spacing Agents: Before adhering a new layer, apply your chosen spacer (foam dots, tape, or acrylic blocks) to the back of the current layer. Press firmly to ensure adhesion. This step is where the magic happens, as it physically lifts each layer away from the one beneath it.
- Final Assembly: Continue stacking until the tree and central ornaments are placed at the front. Once complete, you may choose to leave the piece freestanding or frame it. If framing, use a deep-frame shadow box to accommodate the thickness of the stacked layers.
Practical Applications and Creative Variations
The versatility of the Love Tree design allows it to fit into various home decor styles. For a romantic touch, consider using reds, pinks, and whites in your cardstock selection, making it an excellent centerpiece for Valentine’s Day or anniversaries. For a more neutral aesthetic, stained wood or kraft paper offers a timeless appeal that complements farmhouse or bohemian interiors.
Another popular application is converting the shadow box into a lightbox. By placing an LED strip light behind the rearmost layer of rays, the design glows from within. The rays act as a diffuser, casting beautiful patterns through the cutouts of the tree and hearts. This variation requires careful planning regarding power sources and heat management, but the result is a mesmerizing nightlight or ambient lamp.
Users might also experiment with mixed media. Combining a wooden base with paper layers can create an interesting textural contrast. Alternatively, adding glitter or metallic foil to specific ornaments can draw attention to particular elements of the design, guiding the viewer’s gaze toward the center of the composition.
Conclusion
The Love Tree 3D Layered Cut File is more than just a digital pattern; it is a tool for creating meaningful, personalized art. By understanding the importance of proper spacing and material selection, crafters can overcome common assembly hurdles and produce stunning results. Whether you are crafting a heartfelt gift or upgrading your home decor, this design offers endless possibilities for creativity. Remember, the secret to a successful 3D project lies not just in the cutting, but in the thoughtful layering that brings the image to life.