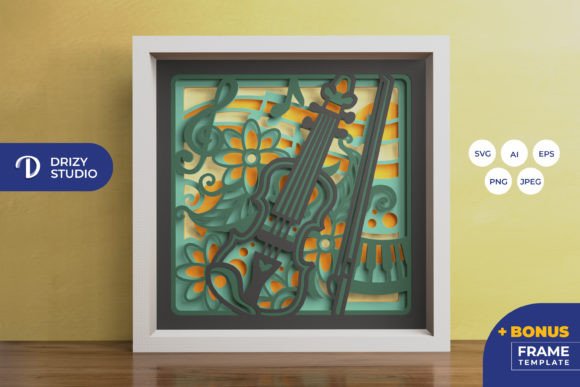
Violin Mandala 3D Shadow Box
Creating a visually striking piece of wall art that combines the elegance of musical instruments with the intricate geometry of mandalas is no small feat. The Violin Mandala 3D Shadow Box offers a sophisticated solution for creators, hobbyists, and interior design enthusiasts who want to add depth and character to their spaces without committing to expensive custom framing or complex construction projects. This layered paper-cutting template transforms simple sheets of paper into a dimensional masterpiece, capturing the soulful curve of a violin within a symmetrical, hypnotic pattern.
However, purchasing digital templates can sometimes feel like navigating a minefield of technical specifications and assembly expectations. Many buyers assume that "digital download" means instant physical gratification, only to be confused by file formats or frustrated by unexpected assembly challenges. Understanding exactly what you are getting—and how to prepare for it—ensures that your final product is not just a craft project, but a lasting work of art. This guide breaks down the specifics of the Violin Mandala 3D Shadow Box, helping you avoid common pitfalls and achieve professional-looking results.
Understanding the Digital Product
When you acquire the Violin Mandala 3D Shadow Box, you are receiving a highly versatile digital asset designed for precision cutting. It is crucial to understand that this is not a pre-made kit containing physical paper; rather, it is a blueprint for creation. The template includes five distinct layers, each contributing to the overall depth and visual complexity of the final shadow box. These layers are meticulously plotted to ensure that when stacked, they create a cohesive image where the violin appears to float within the mandala’s concentric rings.
The file package is comprehensive, catering to users with different equipment levels. You will receive the design in AI (Adobe Illustrator), EPS, PNG, SVG, and JPEG formats. For those using modern electronic cutting machines like Cricut or Silhouette, the included SVG file is particularly valuable. It allows for precise vector-based cutting, ensuring clean edges and perfect alignment across all five layers. If you prefer traditional methods, the high-resolution JPEG preview (3000 x 2000 px) provides a clear reference, while the standard raster files (714 x 714 px) are sufficient for printing and manual cutting with an art knife or scissors.
Technical Specifications and Scalability
The default size of the design is 20.32 × 20.32 cm (approximately 8 inches). This square format is ideal for standard picture frames and works well as a centerpiece on a shelf or desk. A common question among beginners is whether they can resize the design. The answer is yes, but with a critical caveat: you must maintain the same aspect ratio. Distorting the width or height independently will skew the mandala’s symmetry, ruining the optical illusion of the 3D effect. Always use the "lock aspect ratio" feature in your editing software before scaling up or down.
Common Mistakes to Avoid During Assembly
Even with excellent files, the quality of your final shadow box depends largely on your preparation and assembly technique. Here are the most frequent errors seen in DIY shadow box projects and how to sidestep them.
- Ignoring Paper Weight: One of the biggest mistakes is using standard printer paper. Because the design relies on layering, thin paper can buckle or become translucent in unwanted ways, especially if you plan to add lighting. Use cardstock between 180gsm and 300gsm for optimal rigidity and opacity. Heavier paper holds its shape better and creates sharper shadows.
- Inadequate Alignment: Misaligned layers destroy the 3D illusion. When cutting manually, it is easy to drift slightly off the line. To prevent this, cut one layer at a time and use a registration mark (a small triangle or crosshair often included in SVG designs) to align subsequent layers perfectly before gluing. If using a cutting machine, ensure your material is securely taped down to prevent shifting during the cut.
- Rushing the Glue-Up Process: Applying glue haphazardly can cause paper warping or visible blobs that distract from the delicate mandala details. Instead of liquid glue, which can soak into the paper and cause wrinkling, consider using double-sided tape or a fine-tip glue stick applied sparingly to the edges. For a more professional finish, use foam spacers between layers to create consistent gaps that enhance the depth perception.
- Neglecting Lighting Considerations: Many buyers overlook the potential for illumination. While the shadow box looks stunning under ambient light, adding LED strips between layers can transform it into a glowing nightlight or accent lamp. If you intend to do this, choose white LEDs for a crisp look or warm white for a cozy atmosphere. Ensure you leave enough space between layers for the LED strip to fit without pressing against the paper, which could dim the light or damage the cutouts.
Choosing the Right Tools and Materials
To get the best results from the Violin Mandala 3D Shadow Box, your tool choice should match your skill level and desired outcome. If you own a cutting machine, the process is streamlined. Load the SVG file into your software, set the cut pressure correctly for your chosen cardstock, and let the machine handle the intricate cuts. This method ensures uniformity across all five layers, making alignment significantly easier.
For those without cutting machines, patience is your greatest ally. Print the SVG or PNG files onto your cardstock. Using a sharp craft knife and a self-healing cutting mat, take your time. Change blades frequently; a dull blade will tear the paper rather than slice through it cleanly, leading to jagged edges that detract from the mandala’s beauty. Start with the smallest, most intricate inner layers first, as these are the hardest to remove once the larger outer layers are cut. Keep the surrounding waste paper intact until all layers are complete to provide structural support while you work.
Display and Gifting Ideas
Once assembled, the Violin Mandala 3D Shadow Box becomes a versatile decorative item. Its square format and neutral yet artistic theme make it suitable for various settings. In a home office, it adds a touch of sophistication and creativity. In a music room or studio, it serves as a thematic tribute to string instruments. Because it is handmade, it also makes for a thoughtful, personalized gift. Imagine presenting this to a musician friend, a teacher, or a family member who appreciates unique decor. The effort put into assembling the layers conveys care and attention to detail that store-bought items simply cannot match.
If you decide to incorporate LED lighting, consider mounting the shadow box inside a deep-frame box or using a frame specifically designed for shadow boxes. This protects the delicate paper from dust and physical contact while allowing the light to diffuse evenly. Remember that the final color may vary slightly depending on the lighting source and the specific hue of the paper you choose. Experimenting with different colored cardstocks—such as deep black for dramatic contrast or soft pastels for a gentle aesthetic—can yield entirely different moods from the same template.
Final Thoughts on Your Creation
The Violin Mandala 3D Shadow Box is more than just a craft project; it is an exercise in precision, patience, and artistic expression. By understanding the technical requirements, avoiding common assembly traps, and selecting the right materials, you can produce a result that rivals professional installations. Whether you are a seasoned crafter looking for a new challenge or a beginner eager to try your hand at 3D paper art, this template provides a structured path to success. Take your time, enjoy the process of bringing the layers together, and appreciate the beautiful interplay of light and shadow that defines this unique piece of art.